
Chapter One
Product Introduction
Breaks through the traditional design concept and manufacture technique, also combines the market circular cut-pile fabrics’ characteristics, we independently developed our circular knitting machine.
Applications:
Blanket, carpet, coral fleece, high-pile, pine-fabric, peacock cashmere, PV fleece, straw cashmere and all kinds of garments material.
Technical data:
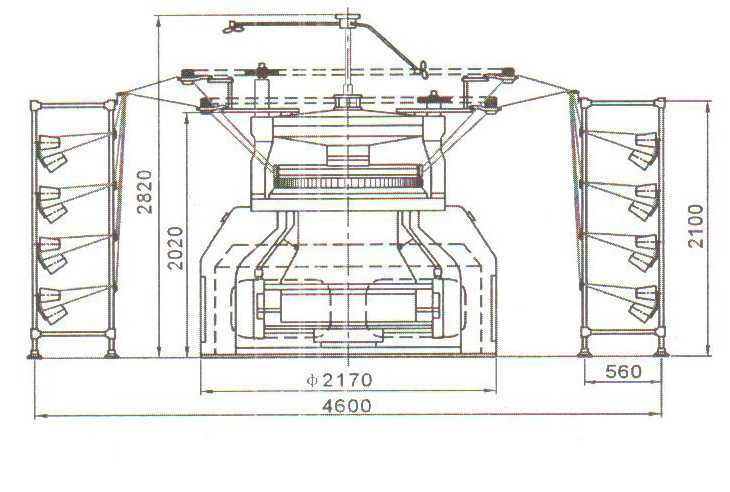
Model: YF3012; YF3016; YF3020; YF3214; YF3218; YF3222; YF3418; YF3420; YF3422; YF3620; YF3622; YF3822; YF3824; YF3826; YF3828; YF4022; YF4026; YF4030; YF4428; YF4432
Cylinder Diameter: 30-38inch
Needle Gauge: 14G-32G
Feeder: 12F-32F
R.P.M: 1-23r/min
Power: 4kw, 5.5kw
Pile height: 4-25, 25-50mm
Chapter Two
Unloading And Installation
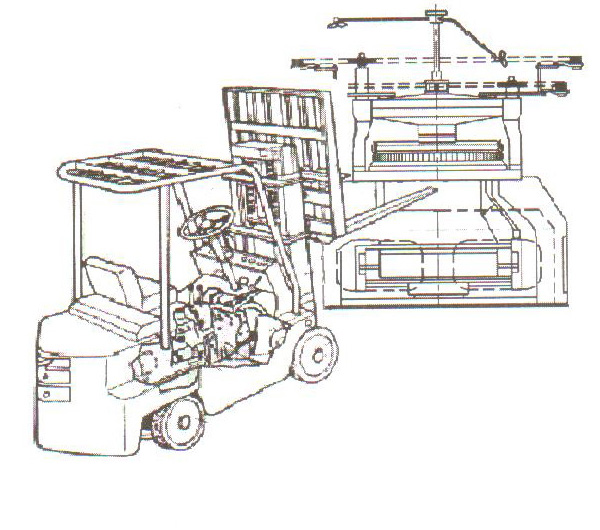
Main frame unloading
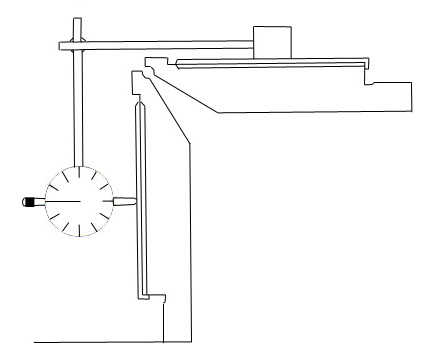
Use more than 5 ton forklift to unload the frame, method as shown in figure 1-1, pl read the instructions bellow:
1.Before unloading, move the transmission system with hand to make the cloth rewinder be parallel with the main foot (normally, the machines have been in this state before delivery).
2.Load the forklift arm into between the two pair of feet slowly, and lift vertically from the bottom (attention: pad some wood block between the arm and machine, to avoiding damage because of machine slip during the unloading)
3.During the unloading, keep the machine about 30-50cm above the ground, do not allowed to run on bumpy road, not allowed to stop or move suddenly, and light up and down carefully.
4.If the machine didn’t delivery to the customer’s factory, please be sure to put in a dry and clean place, to avoiding be affected with dame and corrosion, to avoiding the machine’ normal usability.
Machine position and installation:
1.Before fix the position, measure the position of frame and creel to assure the install position, according the size in figure 1-2
2.After fixed the position, use gradienter to leveling the machine surface carefully (can adjust the foot screw of the main and vice feet, to ensure the lateral error not more than 5mm )
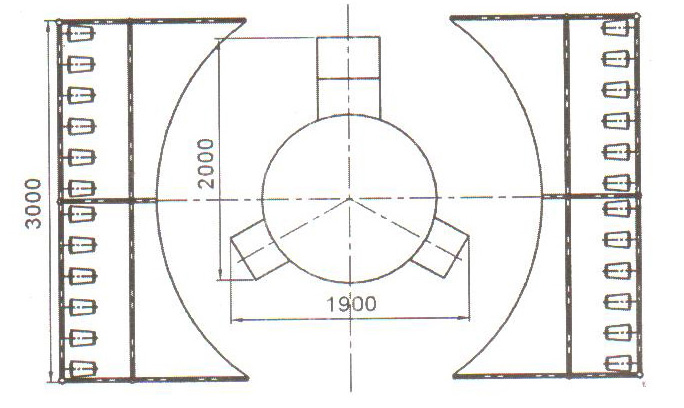
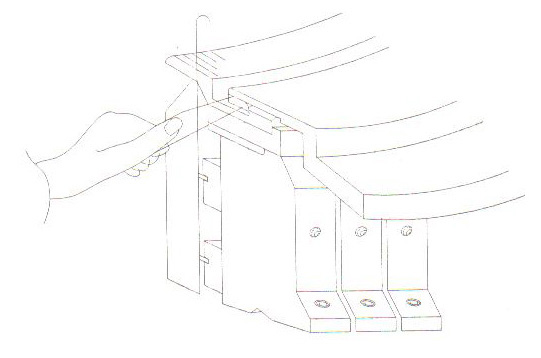
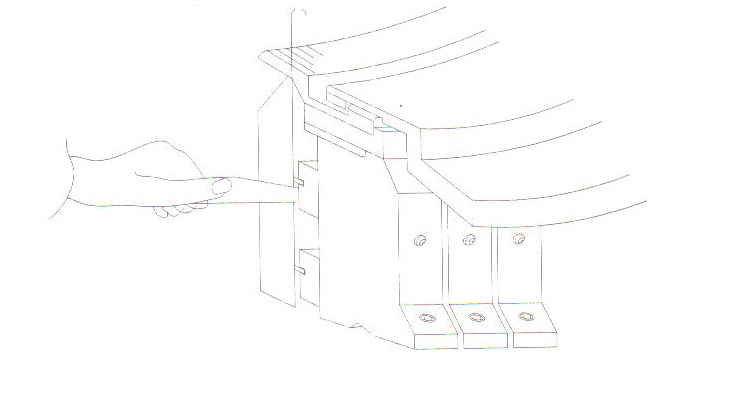
Location and combination of the creel
1.Confirm the position of the creel according to the figure 1-2 size.
2.Connect the Cylindrical column and it’s transom, and set up the frame of the creel
3.Install the four thicker aluminum strips at the backside of the creel (to install the yarn tube track), and the other four thinner ones should be installed before the creel(to install the presser device)
4.The height of yarn feeding aluminum strips should be higher than the presser aluminum, so when knitting, the yarn feeding will be smooth, will not broken easily.
5.Install presser device on the front aluminum stripes, install creel yarn tube track at the back aluminum strips. Keep uniform distance to avoiding yarn feeding.
Combination of the yarn sending
1.Install and adjust the yarn feeding creel transforms and columns
2.Install the up circular frame, up yarn storage device and automatic stop device power supply wires.
3.Install the down circular frame, down yarn storage device and automatic stop device power supply wires.
4.Install the up and down transmission belt.
5.Install the up and down dust collector, pay attention to adjust the fan position.
6.Adjust the yarn aluminum plate
7.Connect the automatic stop device’s power.
Chapter Three
Technical Standard And Primary Adjustment
All of our machine are through strict injection, adjustment and Commissioning work before delivery (all the machine should work more than 48 hours)
Technical standards
1.Self planeness of the up needle dial
Standard≤0.05cm
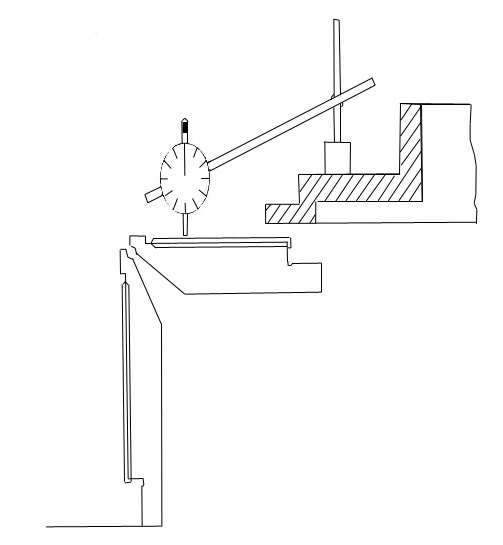
2.Self roundness of the up needle dial
Standard≤0.05cm
3.Self roundness of the down needle drum
Standard≤0.05cm
4.Self planeness of the down needle drum
Standard≤0.05cm
5.The same planeness of the un needle dial and down needle drum
Standard≤0.05cm
6.Same roundness of the up needle dial and down needle drum
Standard≤0.05cm
7.Space between the up cams and needle drum
0.15mm-0.25mm
8.Space between the down cams and needle drum
0.15mm-0.25m
Primary adjustment
Normally, our machine are through strict injection before delivery, but in order to let you use the machine more safety, pl check and adjust before the usage.
1.Check the motor drive
Connect the power, and check the driving direction of the motor, if the direction is different with the label on the motor, change the motor wiring immediately (exchange two of three phases of the motor terminal).
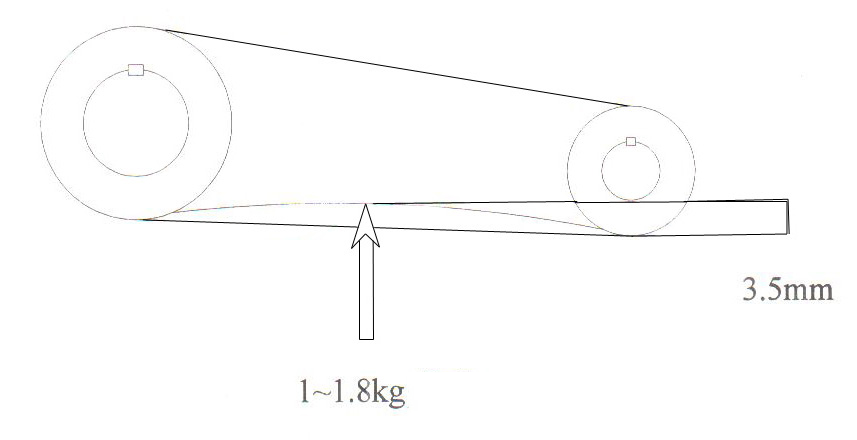
2.Check and adjustment of motor drive belt
Before work, check the tension of the motor drive belt. Gain 1-1.8kg force at the middle of the belt, make the linear deformation of belt less than 3.5mm, adjust it until meet the requirement. Adjust method: loose the motor base lock screw, adjust the motor tension adjusting silk hat, until the tension meet the requirement, and tight the screw.
Attention: at the first three days, recheck once, and check every three month later.
3.Blowing system adjustment
The fan of blowing system need to adjust specifically, until the fan located at the best position. So when the power is on, the fan can blow every corner of the yarn feeding.
4.Adjustment of the yarn transmission system
(1)Micro adjustment of the yarn feeding aluminum plate.
Change the diameter of the yarn feeding aluminum plate, the transmission ratio will be changed, and the yarn feeding amount will be changed. The methods are bellow:
①Firstly, use a wrench to loose the round nut A at the top of the yarn feeding aluminum plate.
②Rotate the cover to “+” direction, the 12 sliders inside the plate will expand outward, to increase the diameter of the wheel, and increased the yarn feeding quantity. Conversely, rotate to “-”, the yarn feeding quantity will decrease. When rotating, keep parallel, otherwise, the sliders may drop from the slot.
③the diameter range of yarn feeding aluminum plate will be: 70-202mm
④After adjusted the plate, relock the round nut.
(2)Tension adjustment of the yarn feeding transmission belt
If the belt is too loose, the yarn storage device will slip and stagnate, and will influence the yarn feeding. So before commissioning, adjust the yarn feeding transmission best as below:

①loose the screw A
②Pull the scroll wheel outward along the slider, make sure the belt stress on the yarn storage device are the same.
③lock the screw A
1.check of grease lubrication
Check the lubrication of each part of the transmission system and cloth rolling system, if there is any abnormal, timely add the grease lubrication
Chapter Four
Normal Problems During The Knitting
Hole
·Main caused by rough yarn
·Because of bad quality or too dried yarn
·Wrong position of the yarn feeding mouth
·Yarn tension is too large or coiled tension is too large
·Coil density is too high
·Knitting circle is too long, and fabric is too thin
Missing needle
·Wrong position of the yarn feeding mouth
·The yarn tension is too small
·Knitting circle is too long
·Yarn trough incorrect feeding mouth hole
·Surface yarn feeding mouth is too high
Tuck phenomenon
·Coiled tension is too small
·Fabric density is too high
·Needle tongue is damaged
Needle tongue damage
·Position of feeding mouth is too high, too front or too back, pay attention whether the yarn entered the feeding mouth.
Needle collision
·Lack of oil or improper use
·The yarn quality is too pore or the creel is unsuitable for the gauge
·The speed is too high or the density of the fabric is too high
·Caused by broken needle drum, needle dial or cam
·Knitting originals are not smooth, not clean enough
·The gap between up knitting dial and drum was wrong
Stripes
·Improper adjustment of surface yarn tension
·Yarn quality is different
·Improper position adjustment of pressure wool wheel
·Improper adjustment of bottom yarn tension
Bar
·Knife is not sharp
·Too much dust in knife, and knife hook is too tight
·Lack of oil, oil amount is too small
Chapter Five
Maintenance
The high speed and high precision of modern knitting machine needs high request of maintenance, therefore, our company seriously summarized some maintenance method of daily work, hope customers can obay the suggestions, to make the machine work in best condition
Initial use and maintenance of machine
1.When the machine finished installation and begin to production, the speed can not be too fast, during the first week 20 hours a day), keep the speed within 10r/min. after one week, gradually adjust the speed to normal
2.The first month belongs run-in period, one month later, change the machine oil in machine grail, and changes every three month
3.Keep the machine oil 1/2-2/3 of the oil leveler, supply timely when the oil is shortage, to avoiding damage the wear plate and cause machine locking
Daily maintenance
1.Clean the dust attached on the yarn creel and machine surface every shift, to keep the knitting part and batching apparatus clean
2.Check the automatic stop device and safety device every shift, if there is any abnormal, repairing or replace it immediately.
3.Check the yarn feeding device every shift, if there is any abnormal, adjust it immediately
4.Check the machine oil mirror and tanker’s oil level tube
Weekly maintenance
1.Clean the yarn feeding Speed aluminum plate, and clean the dust stockpile in the plate
2.Check whether the belt tension of transmission is normal, and the transmission is steady
3.Check the rotation of the cloth rolling machine
Monthly maintenance
1.Remove all the cambox, to clean the dust
2.Clean the dust remove fan and check whether the wind direction is right.
3.Clean the dust of all electrical accessories
4.Review the performance of all the electrical accessories including automatic stop system, safety alarm system, checking system)
Semiannual maintenance
1.Clean all the needle dial and needle, check all the needles, if there is any damage, change immediately
2.Clean the oil spray machine and check whether the oil is unobstructed
3.Clean and check the yarn storage device
4.Clean the dust and oil of the motor and transmission system
5.Check whether the waste oil collection is unobstructed
Annual maintenance
1.The knitting components are the heart of knitting machine, it’s the direct ensure of the fabric quality, o, it is really important to maintain the knitting components
2.Clean the needle groove, to avoiding dust into the knitting fabric. method: replace the yarn with low quality or waste yarn, open the machine with high speed, and inject large amount of oil through the cylinder, Work while refueling, until the waste oil completely out of the groove.
3.Check whether there is any needle damaged, if yes, change it immediately; if the fabric quality is too bad, should consider whether all update.
4.Check whether the cylinder groove is the same distance (or check whether the fabric surface have stripes), whether the needle groove wall is tight.
5.Check the wear condition of the cams, and check whether the installation position is right, and screws are tight
6.Check and correct each yarn feeding mouth position, if there is any damage, change immediately.
7.Check the installation position of each narrowing cam, to ensure that the length of each fabric are the same
Lubricating way, oil and lubrication
1.Lubricating way and oil
(1)Check the dial and cloth rolling machine every day, if the oil less than 2/3, add the oil. Use N10#-N32# machine oil. When half a year maintenance, if there is any oil dust, change immediately.
(2)Check the cylinder base gear every month, add grease, use No.3 lithium lubricating grease
(3)When maintain every half a year, check each transmission bear, add grease, use No.3 lithium lubricating grease.
(4)All the lubrication of knitting components must use knitting oil (including the Injection machine oil), such as the England waker high speed circular knitting machine oil.
2.Lubrication
Know well the oil type and lubricate time of each components, to make sure all the machine can be lubricated in the set time with set oil and set dosage.
Downtime and sealed considerations
Machine’s maintenance and care should be conduct according to half year maintenance procedures, first add lubricating oil in knitting parts, then join the antirust oil on knitting needle, at last covered the machine with tarp which had soak in needle oil and sealed in dry and clean place.
The storage of machinery accessories and spare parts
For common-used and quick-wear part, the normal reserve is an important guarantee of production continuity. The storage environment should be cool, dry and little difference in temperature, regular checking is also necessary.
Storage method is as follows:
1.The storage of the cylinder needle and needle dial
First clean the cylinder needle, and then put it into the wooden box which had put in machine oil and with an oil cloth wrap, in order to avoid bumping and deformation. When using use the compressed air to remove the machine oil inside the cylinder needle, then add needle oil.
2.The storage of cams
Classification the cams and put in storage, which had storage in the box and add antirust oil to avoid rust.
3.The storage of knitting needle
(1)The new knitting needle should be placed in the original packing box, and do not remove the seal.
(2)The old knitting needle must be clean, check, pick out the damaged, classification them and put in storage with the needle oil to avoid rust.
Maintenance of electrical parts
1.The importance of maintenance
The knitting machine circuit contains precision electronic component——inverter. In practical applications, because of the surrounding temperature, humidity, vibration, dust, corrosive gases and other environmental factors, the reliability and service life of the inverter will be badly affected. If maintained properly, not only to ensure reliability but also to extend the service life, and will reduce the production losses caused by the occasional failure. Therefore, regular maintenance of the inverter and peripheral circuits is necessary.
2.Check of the inverter and peripheral circuits
For a running work inverter and control circuits, usually should make the following checks:
(1)Environment temperature: Normal in general - 10 ℃ ~ + 40 ℃ range, at 25 ℃ or so as well.
(2)The inverter input voltage: the normal range is 380V±10%.
(3)Regular cleaning the fly down, dust in the control box to maintain the electric box internal clean, suggested that clean up once a day after shift change.
(4)Oil will speed up the aging wires, if the electrical box inside accidentally into the oil, please cleans up in time.
(5)Regularly check the exhaust fan of electrical box, if damaged please replaced in time, to ensure that the electric box’s internal temperature is not too high.
3.Regular inspection
Using the annual equipment overhaul time, and put the inspection focus on the inverter internal bit.
(1)When doing regular maintenance, must cut off the power before operation until the DC bus power indicator of the inverter is off, usually more than one minute (the larger capacity of the inverter, the longer waiting time), and then carry out the operation.
(2)Dismantle the outside cover of the inverter, vacuuming the inverter circuit board and internal IGBT modules, input and output terminals and other parts. Use cotton cloth with some special cleaning agents to erase the dirty places on the circuit board.
(3)Check the internal lead wire insulation of inverter for whether has corrosion or broken traces, once found should be treated or replaced promptly.
(4)Due to vibration, temperature changes and other effects, some clamping units of the inverter such as screw always become flexible, should tighten all of the screw again.
(5)Check and find whether the input and output reactors, transformers, etc. is overheating, leakage, defective insulation, change color and burnt or have odor.
(6)Check whether the intermediate DC circuit filtering electrolytic capacitor’s capacity and charge-discharge performance is good, whether the appearance has cracks, leakage, swelling, etc., the filter capacitor service life is 5 years, the longest examination period is one year, and after five years please replaces it.
(7)Check whether cooling fan operation is in good condition, if find abnormal noise, abnormal vibration should be replaced immediately. Otherwise the inverter will overheat, and effect the operation life of the inverter. The replacement cycle of fan is generally 2-3 years.
(8)Check the insulation resistance of the inverter whether is in the normal range (All terminals and earth terminal), Note that you cannot use the megameter to measure the circuit board, otherwise it will damage the electronic components of circuit board.
(9)Disconnect the cable of R, S, T inverter terminal with the power end, disconnect the cable of U, V, W inverter terminal with the motor end, measure the insulation between each phase conductor of cable and protecting grounding with megameter whether meet requirement, in normal should be great than 1MΩ.
(10)Before put the inverter into operation which maintenance is completed, the inverter should idle load with motor and test run a few minutes, confirm the rotation direction of motor.
Post time: Apr-20-2022